Tuesday, May 28, 2013

Crocheted iPad Cover - Felted

This month’s Crochet project?  A Felted iPad cover.  I found a You Tube video last year while I was searching for ideas for Christmas Gifts and I’ve been wanting to make it ever since.  I wrote to the author to get a copy of the written pattern.  Several emails later, it was finally posted on his website TheCrochetCrowd.com.  If you’ve never heard of the site, it is wonderful.  There are hundreds of free crochet patterns and videos and they have a great community on FaceBook.  I began the project in early April and finished it in Early May.  It takes a while especially if you are going to go through several color changes as I’ve done.  But I loved this pattern so much as is, I really wanted to go for it.  To challenge myself.  I used a 6MM Crochet Hook or Size J Hook and Patons Classic 100% woolThe colors I chose were, Pumpkin, Yellow, New Denim, Royal Purple, Burgundy & Jade Heather.  In order to felt this carry case, you must use 100% wool.  If you use arcylic yarn or cotton, this process will not work.  But that is fine too.  You do not have to felt this project.  The pattern is different for each version.  You will need to make the bag much larger if you are going to felt it because it will shrink once it is washed.  That’s right I said washed.   Once you have completed your bag, you have to put it through a cycle in your washing machine or you can felt it by hand.  I wasn’t sure I would have the stamina or the umpf to felt this by hand since this is my first attempt so I just threw it in the washing machine. It is a terrifying thought after you spent all this time making this beautiful bag only to possibly ruin the whole thing by washing it, but, have faith. Here is the trick.  Put the item in a zippered pillow case or lingerie bag, throw in a pair of old jeans or a towel to help with the agitation. (The colors of your project may run so beware).   I put 2 Tablespoons of Baking Soda in and a tiny bit of Woolite, set the cycle to hot/cold and crossed my fingers.  The water has to be super hot to break apart the fibers.  You should keep checking on the bag to see how the felting is coming out.  You may need to do another cycle of hot before the cool rinse goes through or you may be able to stop the machine early.  It really depends on the size of the item you are felting.  My bag went through one full cycle and it was fine.  Also my colors did not run so that was a plus.  The cool rinse helps set the fibers.  Then take it out, shape it, and let air dry.  Do not put in the dryer.  I could not believe the difference.  The bag was so big before, my poor iPad was sliding all over the place.  Once I felted it it is an absolute perfect fit.  I was so surprised.  How could the size be exact?  I don’t know but it worked.  And it is 100% unique.  Everyone has an iPad these days but no one will have a carry case like mine!  You can get the written pattern here:  http://thecrochetcrowd.com/accessories-purposes-bags-and-dolls/767-crochet-felted-ipad2-case-cover-pattern.html

I'd love to see your designs too so feel free to post them below in the comments section.

Good luck, and happy crocheting!
Crocheted Cover
Felted Cover


Tuesday, April 23, 2013

Orange Marmalade


Jam vs. Marmalade:

Jam and Marmalade differ in two important ways: their ingredients and the manner in which they are prepared. Both spreads are made with whole fruit, sugar and water, but only marmalade is prepared with a fruit's peels. Because of the importance of peels, marmalade's are made exclusively from citrus fruits, while jams can be made from almost any fruit or vegetable.

The vibrant citrusy flavor you get from this homemade spread is very refreshing, trust me, it is worth the effort of making it.  I say that because it is a two day process.  But don't let that discourage you because the first day is pretty simple. 

All you need is:
4 large oranges (I like navel oranges because they are seedless)
2 lemons
2-3 cups sugar

Hint: add the sugar to your taste.  Depending on the sweetness of the fruit or how sweet you want your marmalade, you may need more or less.  You can go up to 8 cups for a super sweet spread.

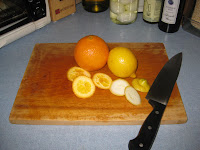
Cutting up the fruit
Directions:
Cut the oranges and lemons in half crosswise, then into very thin half-moon slices. Discard any seeds. Place the sliced fruit and their juices into a stainless-steel pot. Add 8 cups water and bring the mixture to a boil, stirring often. Remove from the heat and stir in the sugar until it dissolves. Cover and allow to stand overnight at room temperature.

The next day, bring the mixture back to a boil. Reduce the heat to low and simmer uncovered for about 2 hours. Turn the heat up to medium and boil gently, stirring often, for another 30 minutes. Skim off any foam that forms on the top. Cook the marmalade until it reaches 220 degrees F on a candy thermometer. If you want to be doubly sure it's ready, place a small amount on a plate and refrigerate it until it's cool but not cold. If it's firm -- neither runny nor too hard -- it's done. It will be a golden orange color. (If the marmalade is runny, continue cooking it and if it's too hard, add more water.)

Starting to break down
Just Enough Water to Cover Fruit


Pour the marmalade into clean, hot Mason jars, wipe the rims with a clean damp paper towel, and seal with the lids.
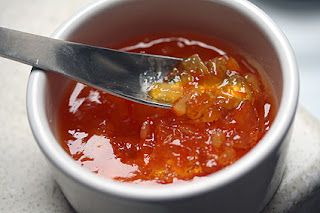
Gorgeous Color

My favorite is to smear this on my morning English muffin.  But who says jams and marmalade's are only good for breakfast?  I've recently made my version of Asian Orange Chicken.  I marinated the chicken in the marmalade, a little soy sauce, garlic, ginger and a squirt of fresh lemon juice and Dijon mustard.  It was delicious. Or spread on a spiral ham or ham steak. 

Another great use for your jars is to give them as handmade gifts.  The rich, golden orange color and pieces of orange and lemon peel give a gorgeous presentation in any gift basket. Especially a Good Morning Basket filled with Brioche Rolls or Croissants, Goat Cheese, Oranges, Fresh Berries, Flavored Butter and Local Honey.  Use your imagination and have fun with it. Plus, as a bonus, you can store the marmalade in your pantry for up to a year so all that hard work of the 2 day preparation is definitely worth the time.
What Will You Add Yours To?


Friday, March 01, 2013

Hooked on Crochet...No Pun Intended

Just the truth!  Over the last few months I have been so busy crocheting, it is all I can think about.  I can't wait to get home at night so I can work my project.  I hope for rain on the weekends so I can stay in and crochet all day.  Unfortunately though, this has meant less time for blogging.  Some of the projects I have been working on are magic potholders, scarves, cowls, hats, coasters and bath scrunchies.  They made wonderful handmade gifts for the holidays or any time of year. Here are some photos of my recent projects.

Magic Potholders
Bath Scrunchies


Magic Potholders


Toddler Hat & Scarf


March is National Crochet Month and I was trying to decide what to do.  Then I found Warm Up America! Warm Up America is a charity that has warmed peoples' lives since 1991.  Today, WUA distributes warm afghans, caps and other items to tens of thousands of people, thanks to the generosity of knitters and crocheters around the country.  It is a really great organization and I can't wait to dive in.  I started a local knit and crochet circle in my town last September and am so excited to present this project to the group.  I'm sure everyone will be as eager as I am to start making our squares.  And it builds community.  Our group will send in our squares and they will be joined together with another group's squares until an afghan is made.  It is a great way to feel connected with others around the country and to help someone in need.  If you knit or crochet and would like to join us, please leave a comment below.

Wednesday, October 03, 2012

Fire Roasted Red Peppers


Delicious right?  Why not make your own?  Now that our gardening season is nearing an end, we are canning and pickling and preserving as much of our last few crops as we can.  This week's menu.  Red Peppers.

First, we built a fire outside with a grill rack on top. I put 9 peppers on the rack to give them that nice smoky char.  You can even see our chickens in the background pecking away.  You can also do this on your outside grill or on your stovetop if you have gas.  You have to keep turning the peppers so they don't get too burnt.  Once all sides have been nice and blackened and the peppers are soft, you can remove them from the grill.

Let them cool down until they are easy to handle. At this point you'll need to peel off all that burnt skin, remove the seeds and put the peppers into a bowl.  It is ok if  some seeds still cling to the peppers or if some of the flesh is a little charred.  That is going to add tons of flavor.  You can tear or cut the peppers into wide strips and reserve all the juices.

Using a sterilized pint size jar add your cut up fire-roasted peppers with all their juices, a couple cloves of smashed garlic, some crushed red pepper, and sea salt. The spices you add are really to your liking.  Add as much or as little as you like or switch it up using the spices you like.  We still have fresh basil outside so I grabbed a handful of that and tore it into large pieces and added to the jar for color along with some black peppercorns and a whole clove.  Seal with the jar with the lid and refrigerate for up to 3 weeks.

Your very own, fresh, homemade,  Fire-Roasted Red Peppers.  Enjoy!


Wednesday, August 29, 2012

My Dirty Hands

One of the main side effects of gardening is dirt under your fingernails.  You get a real sense of the earth and nature and life.  The earth is plentiful and alive.  To think by putting a small seed in the dirt and watering it every day, you can produce your own food.  Naturally.  It is amazing.  You've grown food with your own hands.  You've planted it, watered it, weeded around it, pruned it, harvested it, and ate it.  

Gardening not only produces food for our families, it also teaches our children where their food comes from.  That is such an important life lesson for them.  You don't know what is in the food you get at the supermarket.  You don't know what chemicals they've used to produce that Bell Pepper which is the size of a Cantaloupe.  You don't even know where or how it was grown.  What part of the county.  Think about that.  If you are buying produce from California and you live in NY, how healthy can that produce be for you?  Produce traveling cross country is picked before they are ripe and then pumped with Ethylene gas to force it to ripen quickly and get nice a big so it looks appealing to the consumer.  I don't want to eat something that is pumped with all kinds of pesticides and hormones to help it ripen.  Fact:  8 days after a vegetable is harvested, it loses over 50% of it's nutrients.  

Our First Garden
Right now there is an Urban Homesteading Movement that is sweeping our nation.  

 Definition - Urban Homesteading 
Transforming a city or suburban home into a property that produces some
or all of its residents own food and other subsistence needs. Such as gardening,
raising poultry or small livestock, producing simple products minimizing consumer purchases, and seeking ways to increase self-sufficiency reducing the homes
environmental impact
in a city or suburban environment.
  
Locavores and Farmers Markets are popping up all over the place because people are finally realizing that it is healthier to eat local.  Growing up, I never heard of anyone with food allergies or skin allergies like eczema.  Now a days every school is loaded with kids with food & skin allergies. Why are these types of allergies more prolific now?  I'll tell you why.  The food we are eating is sub par at best.  GMO's, produce pumped with pesticides and herbicides, meats pumped with growth hormones and antibiotics, air that is pumped with every other pollutant.  Neighbors treating their lawns with chemicals, airliners dropping rocket fuel in our waters, towns spraying pesticides, and even the pollutants that can be found in your own home such as in the cleaning products you use.  Our kids are playing on those beautifully manicured green lawns that have been treated with all kinds of chemicals to keep it green and weed free.  But guess what, weeds are green too!

Growing your own food is the best way to live a more sustainable, healthy lifestyle, save money and gain back some control.  After all NJ is the Garden State!  15% of the state is working farm land.  We are 10th in sweet corn production, 8th in tomato's, 4th in bell pepper's, 3rd in cranberries and 2nd in blueberries, just to name a few. So look for the Jersey Fresh Label when you are shopping, be more conscience of your everyday decisions and plant your own garden today. 

Our Plentiful Harvest

For more information on gardening, visit:
http://woodlotfarms.com/Square_Foot_Garden.html

For more information on Urban Homesteading visit:
http://woodlotfarms.com/Urban_Homesteading_CF7M.html


Tuesday, June 19, 2012

Summertime Means Ponytails

Mason was helping me set up the photo, MEOW!
I've been doing lots of "You Tubing" this season to find new ways to "updo" my updo. Fishtail braids, cascading french braids, cute low rider buns and super chic twists. In a quick pinch though a pony is my go to updo. Quick and simple. But, simple doesn't have to be boring. My new Crochet Project is cute and fun, colorful scrunchies. These are great for any age and they are so versatile. The yarn I like to use for this project is 100% cotton. So they are even machine washable. I think the cotton works best to give the edges that frilly, girlie, playful look. I just found a self striping yarn in red, white and blue so I am getting started on my 4th of July scrunchies. They are going to be so great for all the BBQ's I'll be attending that weekend. Next it's fun in the sun August where I'll be wearing a hot pink, yellow and orange scrunchie seen in the photo.

These make great gifts too.  Photo below is an example of two dresses I bought for my friend's 3 year old.  On the left side of each dress, you will see the matching scrunchies I  made.   Too cute!